Getting Started: Cubicore Gateway Series
Applicable to the Cubicore Gateway Hub and Cubicore Gateway Pocket — dual-channel LoRaWAN-compatible gateways for Philippine deployments.
Confirm the current product status and supported features in the applicable product documentation before deploying in production.
Overview
The Cubicore Gateway Series consists of the pre-configured, dual-channel LoRaWAN-compatible Gateway Hub and Gateway Pocket. It connects to a Wi-Fi access point and forwards LoRaWAN traffic to a LoRaWAN network server.
Both gateway models contain the same two independently provisioned channel devices and share the same internal provisioning hardware, including the screw-secured top button cover. During the initial setup, configure both devices using the ESP BLE Provisioning application. After both channels are connected to Wi-Fi, the gateway is ready to forward LoRaWAN traffic.
For the recommended Philippine configuration, use AS923 Group 3 with the default channels, SF10 / BW125, disabled dwell time, and ADR disabled. These settings are consistent with Cubicore's recommended Gateway Pocket configuration.
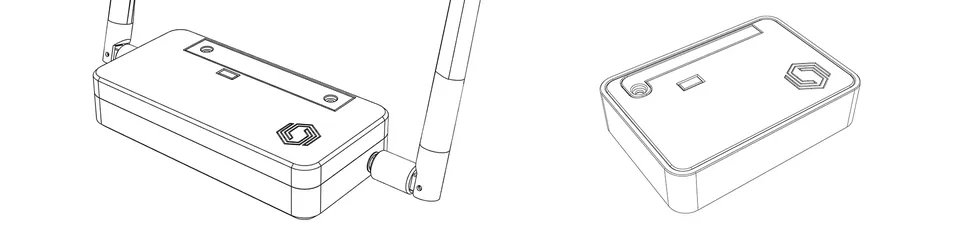
The two models in the Cubicore Gateway Series — the Gateway Hub and the Gateway Pocket.
Before you begin
Prepare the following:
| Requirement | Details |
|---|---|
| Gateway | Cubicore Gateway Hub or Gateway Pocket |
| Smartphone | Android or iOS device with Bluetooth enabled |
| Provisioning app | ESP BLE Provisioning from Google Play or the Apple App Store |
| Wi-Fi | The network that the gateway will use for Internet access |
| Wi-Fi credentials | Network name and password |
| Gateway identifiers | The two Gateway EUIs printed on the box label or supplied with the product |
| Provisioning PIN | abcd1234 |
Keep the smartphone close to the gateway during Bluetooth provisioning. The two BLE devices correspond to the selected gateway's two channels, so both must be provisioned.
Initial Wi-Fi setup
1. Power on the gateway
Connect power to the Gateway Hub or Gateway Pocket. Out of the box, the gateway is already in Bluetooth pairing mode.
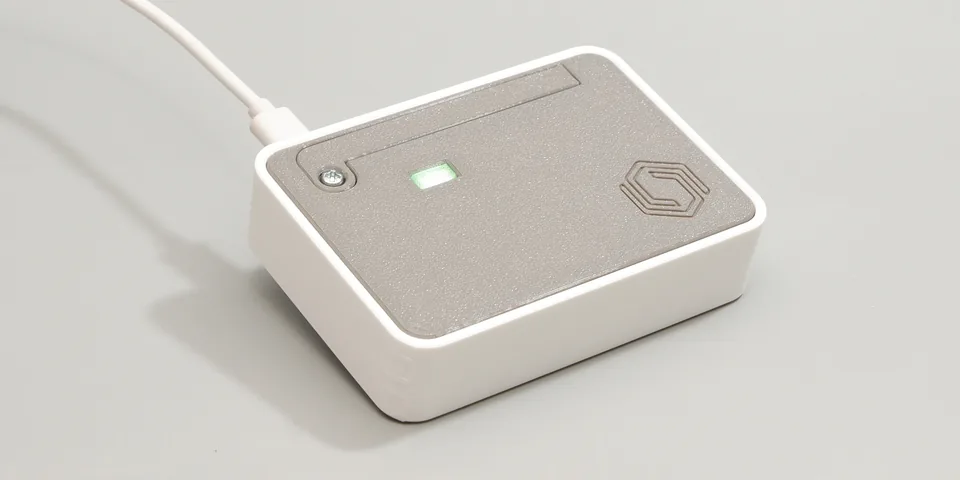
Connect power to the gateway — out of the box it is already in Bluetooth pairing mode.
2. Open the provisioning app
Open ESP BLE Provisioning, then tap:
- Provision New Device
- I don't have a QR code
The application will scan for nearby BLE devices.
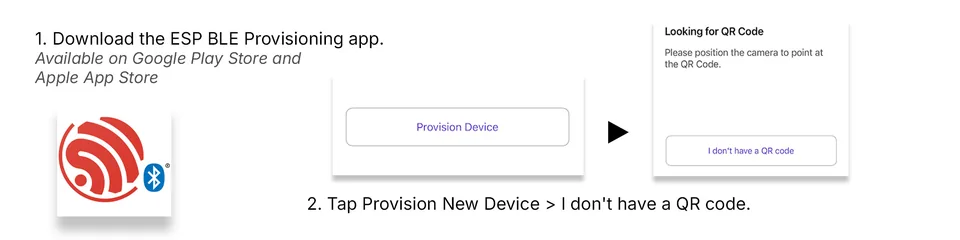
Open ESP BLE Provisioning, tap Provision New Device, then choose I don't have a QR code.
3. Filter for the gateway devices
Change the BLE device-name prefix to:
LRHB_
Two devices should appear. They match the two Gateway EUIs associated with the Gateway Hub or Gateway Pocket.
Select the first device for the first provisioning cycle.

Filter the device list to the LRHB_ prefix, then select the first device for the first provisioning cycle.
4. Enter the proof-of-possession PIN
When prompted for the proof-of-possession PIN, enter:
abcd1234
Tap Next.
This PIN is shown in the supplied quick-start material. Treat it as a device setup credential and do not share it outside the authorized installation team.
5. Select the Wi-Fi network
Select the Wi-Fi network that the Gateway Hub or Gateway Pocket should use. Enter the network password, then tap Provision.
The app will show progress while it:
- Sends the Wi-Fi credentials
- Confirms the Wi-Fi connection
- Provisions the selected channel
When the app reports that the device was successfully provisioned, tap OK.

Enter the Wi-Fi network credentials and tap Provision — the app confirms the Wi-Fi connection and reports success.
6. Provision the second channel
Repeat the previous provisioning process for the second BLE device:
- Return to the BLE device list.
- Keep the prefix set to
LRHB_. - Select the second device.
- Enter
abcd1234. - Tap Next.
- Select the Wi-Fi network.
- Enter the Wi-Fi password.
- Tap Provision.
- Wait for the success message.
- Tap OK.
Both Gateway Series models are dual-channel gateways. Provisioning only one BLE device leaves the other channel unconfigured.
Verify the gateway connection
After both channels have been provisioned:
To view and manage the gateway from your own The Things Network account, you must first claim it. If the gateway is not claimed to your account, it will not appear in your TTN console even after both channels are provisioned. Start with Set Up and Claim Your Cubicore Gateway, then return here to verify the connection.
- Leave the gateway powered on for several minutes.
- Confirm that the selected Wi-Fi network has Internet access.
- Open the configured LoRaWAN network server.
- Confirm that the gateway EUI is registered and online.
- Test the gateway with a compatible LoRaWAN end node.

Confirm the gateway is registered and online in the LoRaWAN network server console.
After the gateway is claimed and both channels are provisioned, the gateway should appear online in your The Things Network account. If the gateway does not appear online, see Troubleshooting.
Changing Wi-Fi networks
Re-provisioning overview
To connect the Gateway Hub or Gateway Pocket to a different Wi-Fi network, manually trigger Bluetooth pairing mode for both channel devices. This requires removing the screw-secured top button cover and using the RESET and BOOT buttons inside the enclosure.
Disconnect power before opening the Gateway Hub or Gateway Pocket. Do not work inside the enclosure while it is powered.
1. Remove the top button cover
- Disconnect the gateway from power.
- Remove the screw or screws securing the top button cover.
- Carefully open or remove the top button cover.
- Locate the two sets of RESET and BOOT buttons.
The number of screws securing the top button cover depends on the model:
- Cubicore Gateway Pocket: one screw
- Cubicore Gateway Hub: two screws
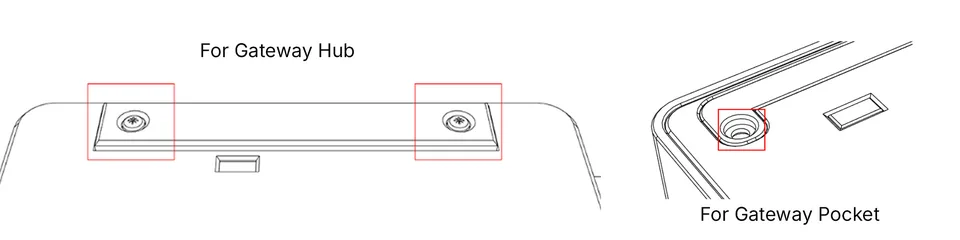
Locate the screw or screws on the top button cover — two on the Gateway Hub, one on the Gateway Pocket.
2. Trigger pairing mode for channel one
On the first button set:
- Press RESET.
- Immediately press BOOT.
- Press BOOT within approximately five seconds after pressing RESET.
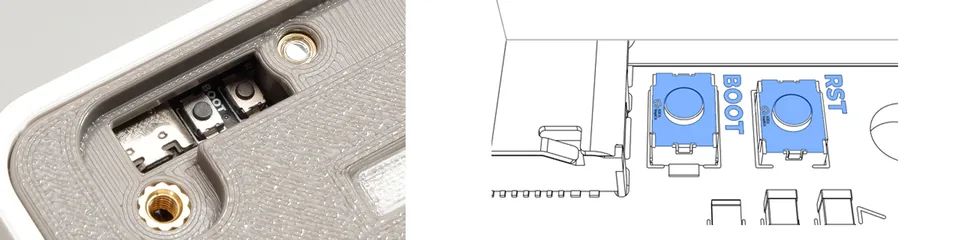
On the first channel set, press RESET and then BOOT to trigger pairing mode.
3. Trigger pairing mode for channel two
Repeat the same sequence on the second button set:
- Press RESET on the second set.
- Immediately press BOOT on the same set.
- Press BOOT within approximately five seconds after pressing RESET.
Make sure RESET and BOOT come from the same channel section. Do not combine RESET from one set with BOOT from the other.
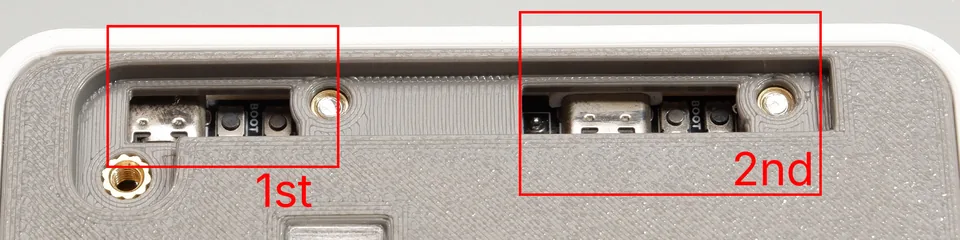
Repeat the RESET then BOOT sequence on the second channel set to trigger its pairing mode.
4. Provision the new network
Open the ESP BLE Provisioning app and repeat the initial Wi-Fi setup for both LRHB_ devices.
For each channel:
- Select the device
- Enter the proof-of-possession PIN
- Select the new Wi-Fi network
- Enter the new password
- Tap Provision
- Wait for the successful-provisioning message
After both channels have been re-provisioned, replace the top button cover and reinstall the screw or screws (one for the Gateway Pocket, two for the Gateway Hub), reconnect power, and verify that the gateway returns online.
Recommended LoRaWAN configuration
The following values are recommended for Philippine / NTC-compliant deployments.
Network-server settings
| Setting | Recommended value |
|---|---|
| Frequency plan | Asia 920–923 MHz (AS923 Group 3) |
| LoRaWAN version | 1.0.4 |
| Regional parameters | RP002 1.0.2 |
| Gateway setting | Disable Enforce duty cycle |
| Dwell time | Disabled |
| LNS address | au1.cloud.thethings.network |
| Packet-forwarder port | 1700 |
| SNTP server | ntp.pagasa.dost.gov.ph |
Gateway channel settings
| Channel | Frequency | Modulation reference |
|---|---|---|
| Channel 1 | 916.6 MHz | SF10 / BW125 |
| Channel 2 | 916.8 MHz | SF10 / BW125 |
End-node settings
Configure compatible sensors and end nodes as follows:
| Setting | Recommended value |
|---|---|
| Region | Asia 920–923 MHz (AS923 Group 3) |
| Channels | Default channels only |
| Enabled frequencies | 916.6 MHz and 916.8 MHz |
| Data rate | DR2 |
| Spreading factor | SF10 |
| Bandwidth | 125 kHz |
| ADR | Disabled / OFF |
| Dwell time | Disabled |
The gateway and end nodes must use compatible regional parameters, channels, data rate, bandwidth, ADR, and dwell-time settings. A node configured for another region or channel plan may fail to join or communicate reliably.
Troubleshooting
| Symptom | Recommended action |
|---|---|
| No BLE devices appear | Confirm Bluetooth is enabled, move closer to the gateway, power-cycle the gateway, and scan again. |
Only one LRHB_ device appears | Confirm that both channel button sets were placed in pairing mode, especially during re-provisioning. |
| PIN is rejected | Confirm that the PIN is entered exactly as abcd1234, using lowercase letters and no spaces. |
| Provisioning fails | Confirm the Wi-Fi password, verify that the network is available, and repeat the procedure for that channel. |
| Gateway is not online | Check gateway power, Wi-Fi Internet access, gateway registration, and network-server settings. |
| End node cannot join | Confirm AS923 Group 3, default channels only, 916.6 / 916.8 MHz, SF10 / BW125, ADR disabled, and dwell time disabled. |
| Gateway works on one channel only | Re-provision the missing channel and confirm that both gateway EUIs are registered correctly. |